

Why Doesn't Paint Bucket Work Adobe Animate
Why Doesn't Paint Bucket Work Adobe Animate
This time we're going to talk about Wick Editor. I came across this website by chance and it surprisingly good for animation.
According to the website, Wick Editor is a free and open-source tool for making games, blitheness, and everything in betwixt. People frequently compare it to Adobe Flash/Animate. So we are curious and decide to give information technology a attempt. This tutorial will walk y'all through how to breathing with Wick, along with 2 exercises on creating simple animations.
From its website, it seems that Wick is intended for beginners and casual users. It turns out that Wick is quite elementary, fun and like shooting fish in a barrel to learn. This article is a handy quick-tutorial for beginners to introduce the tool and try to get artistic with it by creating simple animations.
If y'all similar this app and want to explore it farther, you can cheque their official tutorial. They have several articulate, interesting, and comprehensive videos. There is a discussion forum too.
If you adopt a video tutorial, please check our video beneath or on our YouTube channel. Information technology's a source of this tutorial, presented in the Indonesian language with an English subtitle.
Getting started
Wick is a spider web application, and then you just need a browser. You tin run it immediately, no need to install it, no affair what OS you use. Windows, Linux, Mac, tablets, etc. If yous don't desire to connect to the internet all the time, there is also an offline version available that can exist downloaded and installed every bit usual. Still, at the time this tutorial was made, the offline version was still in beta. So only proceed an eye on it.
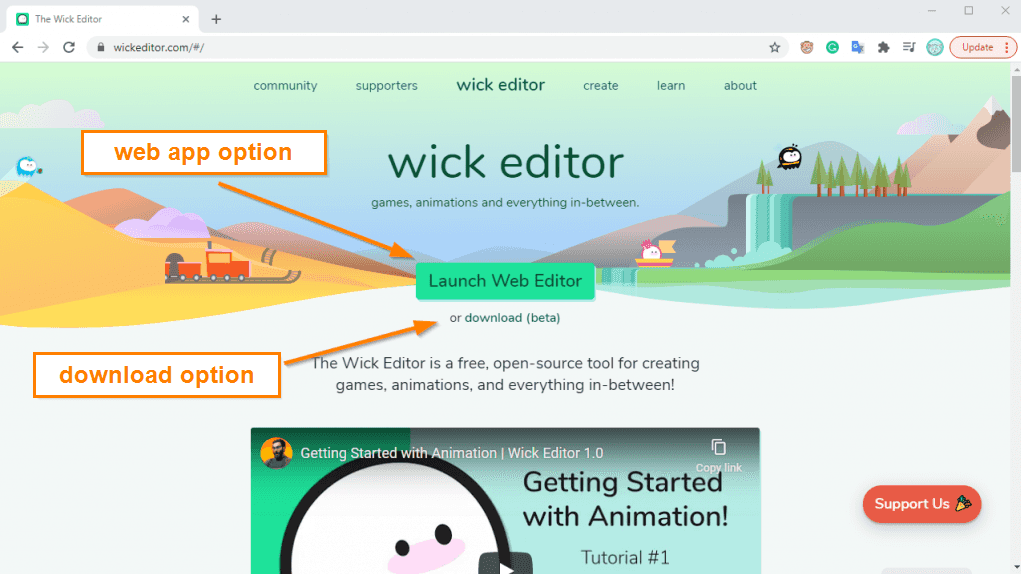
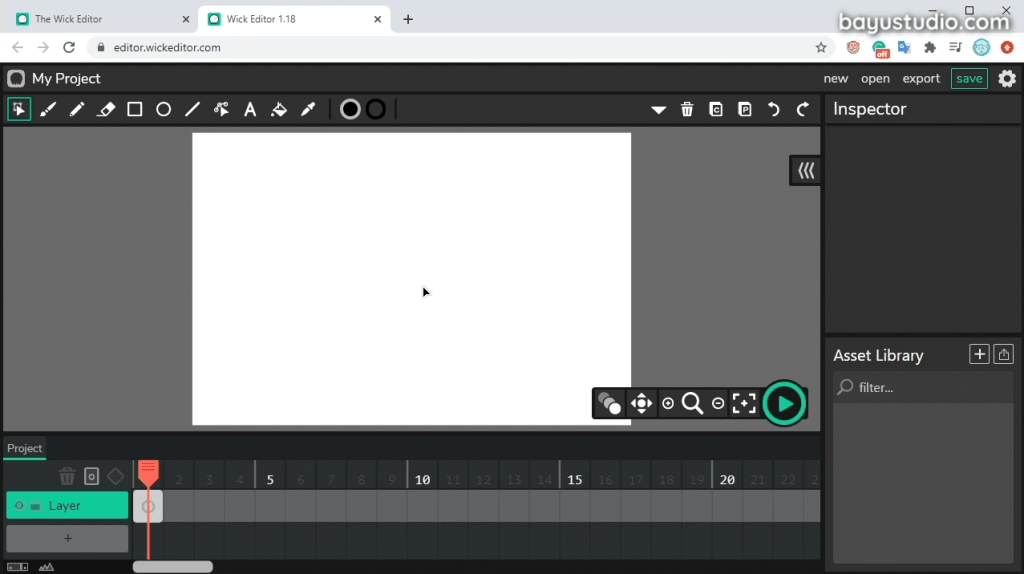
In this tutorial, let'due south only utilize the online version. So nosotros don't need to install anything. Nosotros can directly run it with the Launch Web Editor push button. A new tab will announced and load the editor. This is what it looks like, convincing enough, notwithstanding simple and far from beingness complicated.
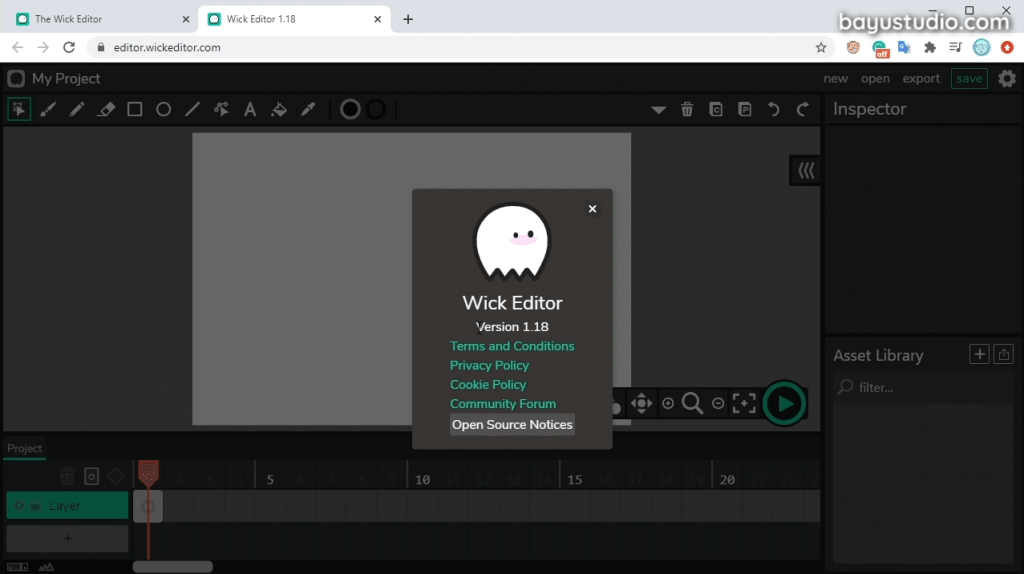
This app is constantly being developed. It'south possible if it has a dissimilar interface by the fourth dimension you try it yourself. But I think the bones functionality will remain the same. To check the version, you lot tin click on the logo in the upper left corner. Currently, I become version ane.18.
Many people compare the Wick Editor with Flash. Do you retrieve Flash? Currently, it's known as Adobe Animate CC. Flash was very pop and became the de-facto multimedia format standard for the web in the belatedly 1990s and 2000s. It allows the web that was mostly static to get more than interactive with total of blitheness.
Tin Wick Editor be a spiritual successor of Flash? In my opinion, in that location are similarities with the old version of Wink, and then there is a lot of potentials. Even so, it is simpler and very user friendly. Even though the features seem limited, making animation here looks piece of cake and fun.
Like Flash, Wick is basically a vector-based animation program. This means that if nosotros depict something, then nosotros zoom it in, the quality stays smooth. We tin can also describe using archaic vector shapes, such as circles, squares, to the custom free-class shapes.
Simply even though this is a vector editor, it reminds usa of a non-vector image editor. When we talk about vector editor, what comes to your mind mayhap something similar Inkscape, Corel Draw, or Illustrator, where we more often than not draw using pen and bezier tools. Path by path.
If you have ever used Wink, it might be a little familiar with drawing workflow like Wick. It is quite like shooting fish in a barrel. You tin can depict freely using a pen. Then fill it using a paint bucket, merely like when y'all depict in elementary bitmap editor similar Microsoft Paint. The cartoon workflow is a sort of combination betwixt bitmap and vector, where the use of stroke and fill is just similar a dissimilar object.
User Interface
The UI (user interface), every bit I said before, is quite simple. I group it into:
- Tools
- Timeline
- Inspector
- Asset Library
- Outliner
Hither are tools for drawing on the left. Then on the right, there are option buttons that change co-ordinate to the context of the tool used. So if you lot use a brush, the push on the correct will be different from when you use a pencil.

Drawing tool
Cursor
To select objects on the canvas.

Brush
To draw using a straight shape.

And so even though it looks like a line, information technology's actually a shape. And so if we pull information technology, it will show that information technology's a shape.


So in the right side, there is a brush smoothing tool to refine our brush strokes.

Because if your hand is shaky or if you are likewise tiresome, the path result will non be great. So you tin add the smoothing value hither. If the smoothing value is increased, it will be slowed down and smoothed.
Then this is the relative castor size. If this tool is agile, information technology means that fifty-fifty though I zoom out, the size will remain the same as the previous screen size before. And if I zoom in, the brush size volition match the screen size. Then the line looks smaller.

This tool is suitable for drawing details. You lot don't need to modify the brush size. Just zoom in or zoom out the screen.
Then there are options on the castor manner, inside and exterior, just similar in Wink.
So if you desire to color a shape, and cull the within ane, information technology will fill the inside of the shape. Even though information technology leaks out, the colour volition only appear inside the shape.
Otherwise, the outside selection ways that it will only appear on the outside, and the inside is non filled in.


Pencil
To draw using a stroke or line.

And then if we pull the line, the line volition be bent (it remains a line, not a shape). If using a pencil tool, it is better to draw using a tablet.
Eraser
To delete lines, shapes, and other primitive shapes.

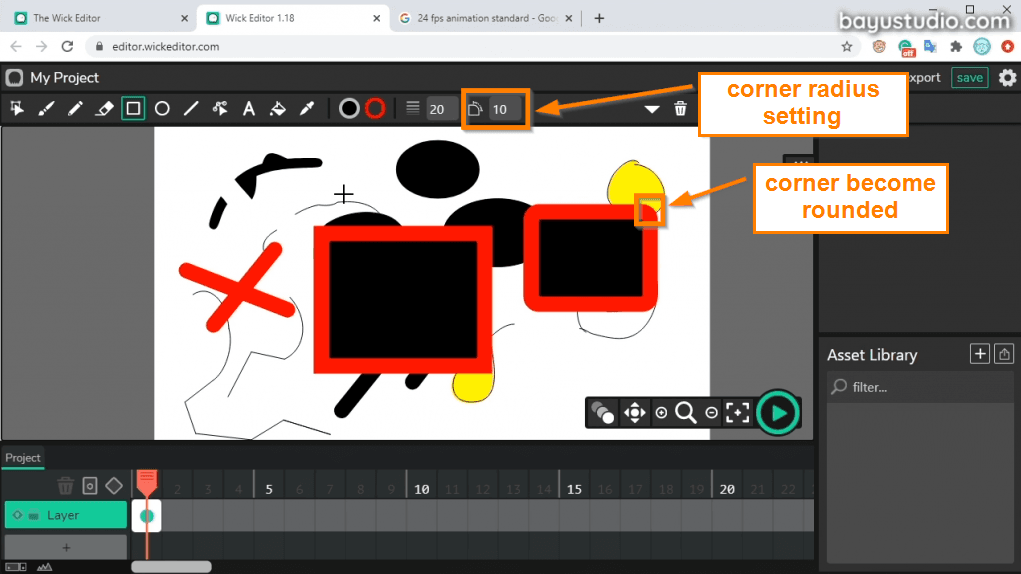
Rectangle
To make a rectangle or a box. In this tool, in that location is a stroke width choice to suit the thickness of the line, and a corner radius to brand rounded box.

Circle
To make a circle / ellipse.

Line
To brand a line. This tool is suitable for mouse users. Nosotros could brand a curved line from directly lines, that pulled with the cursor path (adjacent).

Path Cursor
To edit and pull lines and shapes. This tool is similar to Inkscape and Flash tool.

Text
To create text.

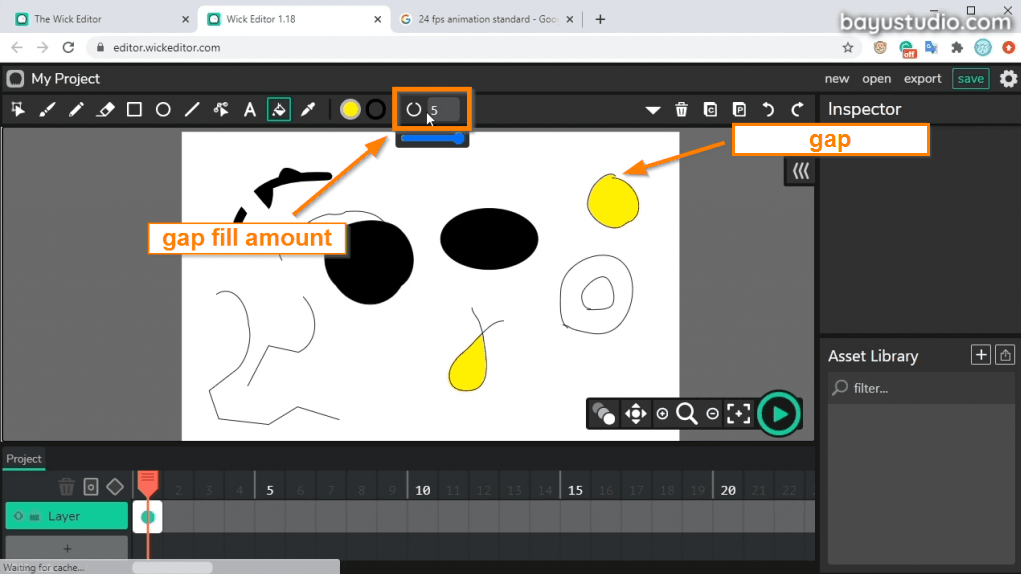
Make full bucket
To fill/colour a field. For example, we have a closed field, we can cull a colour, and then fill it with a make full bucket.

The interesting part is if we color a field with a fill saucepan tool, then it will create a new shape, so it will be a dissimilar object. Just like in Wink, where the lines and the make full are separated.
There is also an option here for the gap. If your curve is open a piddling and you lot want to color it, then you can increase the gap-fill up amount value.
For the keyboard shortcut, so you can immediately see once you hover the tool. The line uses the letter L, so press the L key on the keyboard. As for the ellipse, use the alphabetic character O.
Middle dropper
To cull a color that already exists on the sail. What'due south interesting is that after we take the colour, it will return to the tool we selected earlier. For example, nosotros used a line, then nosotros take the color with the eyedropper, information technology will return to the line tool.

Coloring tool
Make full color
To color shape, fields, or areas.

Stroke color
To color the lines / strokes. If we draw primitive objects, using pencils, lines, squares, circles, etc., nosotros can get the strokes, co-ordinate to the specified size.

Control tool

Play/Pause
To play and pause animation that nosotros make.

Panning
To motion the canvas.

Zoom
To zoom in and zoom out the canvas.

Recenter
To return the canvas to the center.

Onion skinning
To bring out the shadow from the previous frame and the next frame, so cartoon frame past frame animation will exist easier.

Canvas Activeness
Ordering
To put objects to the back (send to back), put objects 1 level lower (ship backward), put objects ane level above (send forward), put objects to the front end (transport to front).

Flip
To reflect objects horizontally and vertically.
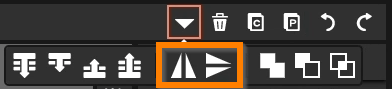
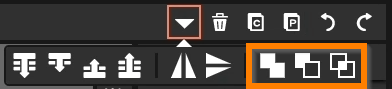
Unite, Decrease, Intersect
To combine, subtract and cut objects. So if we take ii dissever objects, they can be merged using the unite tool, then that they become 1 path.
Timeline
The identify where we arrange the animation frames is called a timeline. If the width of the timeline panel is too narrow, we tin can resize it by dragging the border. Especially if later on when nosotros have many layers hither.
In each layer has its own timeline. When creating a new certificate, in that location is a default layer chosen Layer (first layer/layer 1). In each layer, we can create frames and keyframes (keyframe is a frame that has images/data in information technology). To add together a frame, press the plus sign (+).
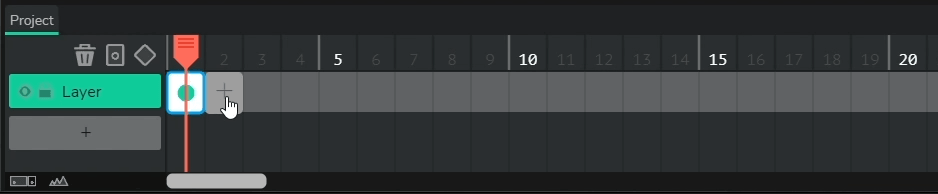
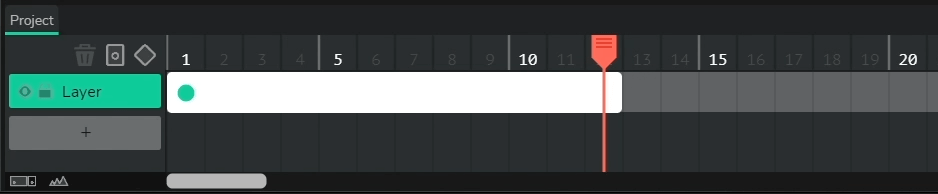
Frames tin can be pulled to any length if we want the same paradigm in several frames.
When nosotros set the frame charge per unit at 12 fps, it means that the prototype displayed for 1 2nd is 12 frames long. And then that for the 2nd 2d means from frame 13 to frame 24, and then on.
Frame by frame animation
When we want to make an animation by cartoon the frames 1 by one, this is chosen frame by frame animation. We draw each frame or from scratch. Frame by frame animation allows u.s.a. to depict freely. Whatever we want. And then we draw in the first frame, then second frame, 3rd, and so on.
To brand it easier, you can actuate the onion skinning, and then that in that location will be shadows from the object of the previous and next frame. When onion skinning is activated, there are cherry indicators on the right and left of the play caput, to bear witness the previous and side by side frames.
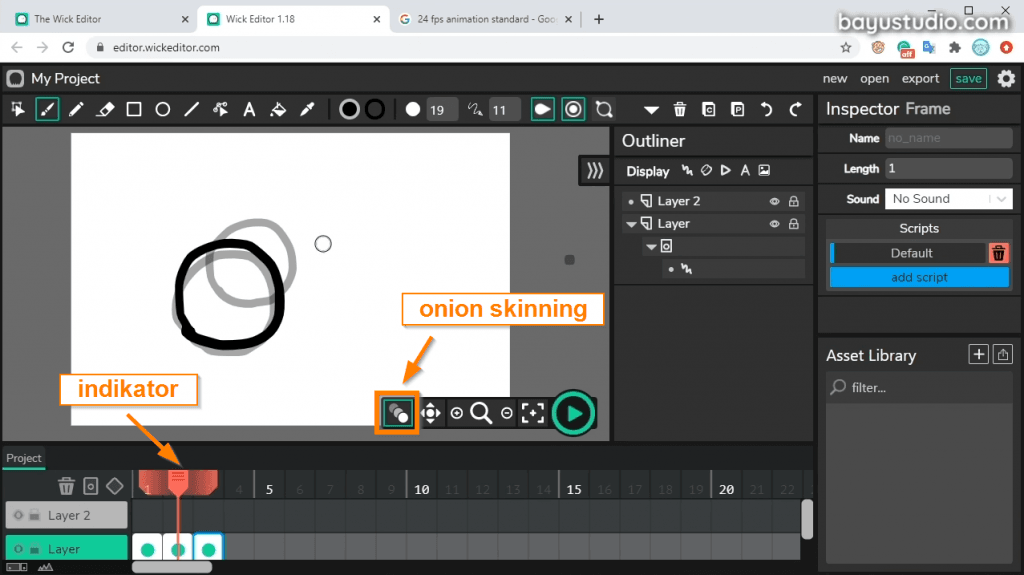
The default covers of onion skinning are merely the previous and the next frame, but we can likewise extend the range, by pulling the red indicator. So the shade will notwithstanding visible equally long as it'due south still in coverage, just they are sheerer. The farther it goes, the sheerer information technology will be.
If yous want to breathing the same image, we tin copy frame 1, then drag it to the second play caput, then paste it. So that it will duplicate the same image. Then motility the object to the forepart. So from frame one to frame 2, the image will be moved. This is chosen frame by frame animation. And then nosotros draw each frame once more manually, or we duplicate it from the previous image.
Tween blitheness
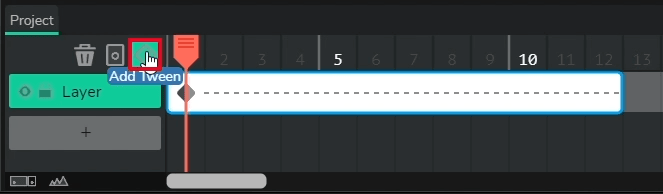
Beside frame by frame animation, there are also other animation methods that are supported in Wick, that is tween blitheness. Using tween blitheness is and so convenient because we don't demand to draw each frame if nosotros desire to animate the object position.
We only need to draw 1 object, and then drag the frame size, and then to create a tween animation, click on the keyframe, and then click Add together Tween.
Then we determine the last position, and then we create another keyframe, by clicking Add together Tween again.
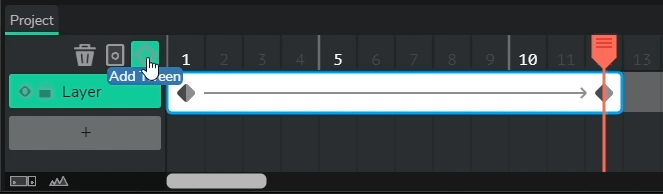
If we click play, the object will motility. In tween blitheness, we only need to ascertain the initial and final positions, and so Wick will automatically create the rest.
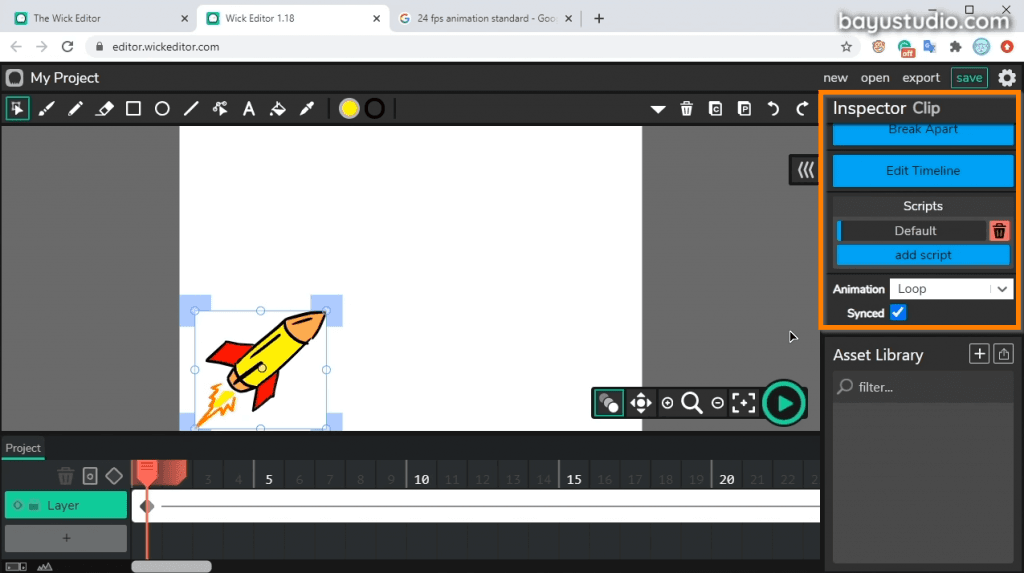
Inspector
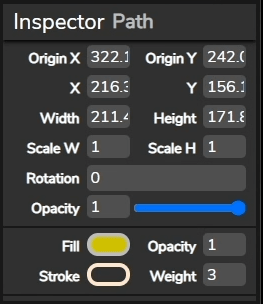
On the elevation right, in that location is an inspector that contains the properties of the objects on the canvas. Once nosotros select the object on the sheet, its inspector path will be filled in. So that later we tin change the properties, such as fill up, stroke, size, opacity, coordinates, etc.
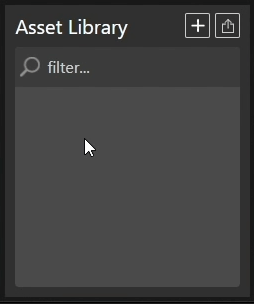
Nugget Library
Then at the bottom correct there is an asset library. It looks like it is for ready-to-use avails. A kind of stock of assets. We can upload ours besides. Looks like it'due south nevertheless beta, permit's but ignore it this time.
Outliner
To show the structure or bureaucracy of objects and frames of the document. If nosotros draw an object, it volition create a new object under the currently active frame and layer. Open outliner panel by clicking the arrow on the left of the inspector, and so the outliner volition open up.
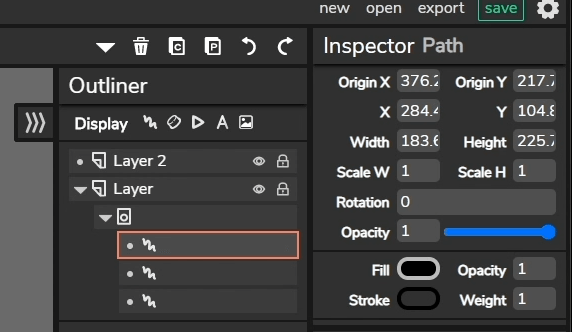
To select, other than regular selection via canvas, it can also be done through this outliner. And to select multiple objects at once you can press Shift central.
To select all, y'all tin can select by elevate and drop or press Ctrl + A, like in many other applications.
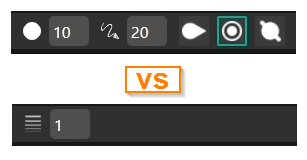
Mouse vs tablet
Here I'm using a tablet, an old small Wacom Bamboo. Instead of mouse, Ideally we need tablet to describe comfortably. You can use any pen tablet y'all have.
Why is it ameliorate to utilise a tablet? Considering the brush tool in the Wick editor supports pressure sensitivity. So it can detect the thickness of the line based on the pressure level.
In Wick, at that place is no bezier or pen tool equally in vector editor like Inkscape or Illustrator, where yous tin can hands use a mouse to draw precisely with the pen tool or bezier.
If you dont have tablet and want to employ Wick Editor, thats fine, with mouse you can use the line tool. Then you commencement with directly-lines first, then subsequently, use the cursor path to bend those lines.
If your hands are quite precise or if you are good at using the mouse, you lot can too draw directly using the brush tool or a pencil tool. The output of the pencil tool is stroke, while the brush tool is a shape, as explained earlier.
I adopt the brush style. And so it'southward a kind of doodling-manner. The animation will not be very smooth. It'due south like a hand-fatigued. I observe information technology unique and artistic enough.
Make simple animation
Now let's first our first exercise past trying to brand a simple blitheness. You tin can download the sample file at the cease of this section.
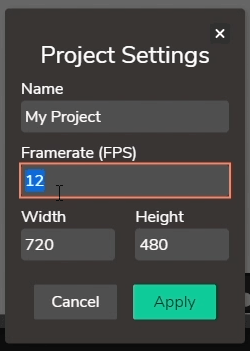
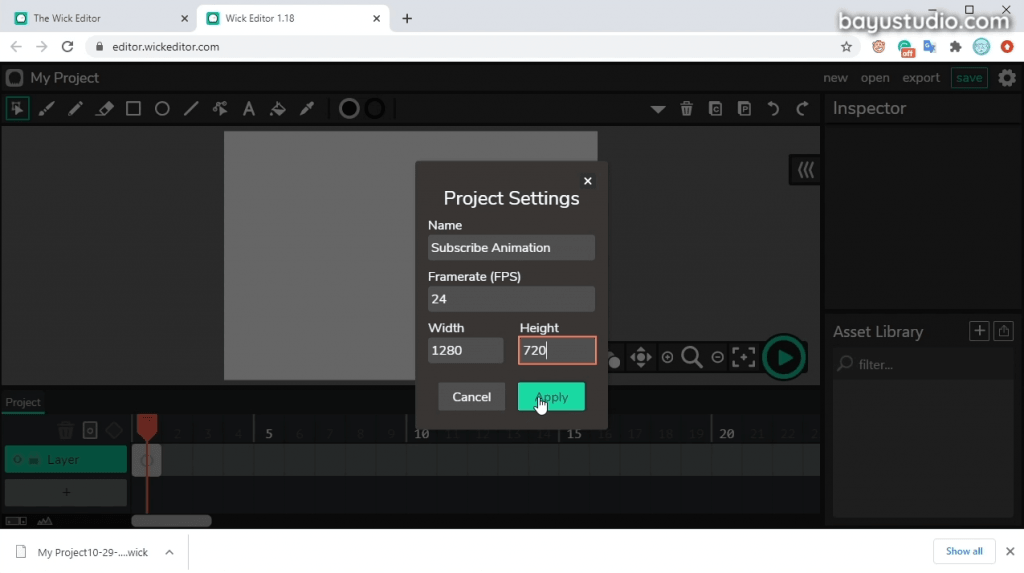
Firstly, to create a new project, we tin click on My Project in the top left corner. So there are settings to determine the sail size and frame rate.
Frame rate ways how many frames per 2nd. More than frame rate ways the smoother our blitheness will exist. Usually, on Youtube video or video in general, the format used is 30 fps to 60 fps. Let's just use the default, which is 12 fps. Then click Apply.
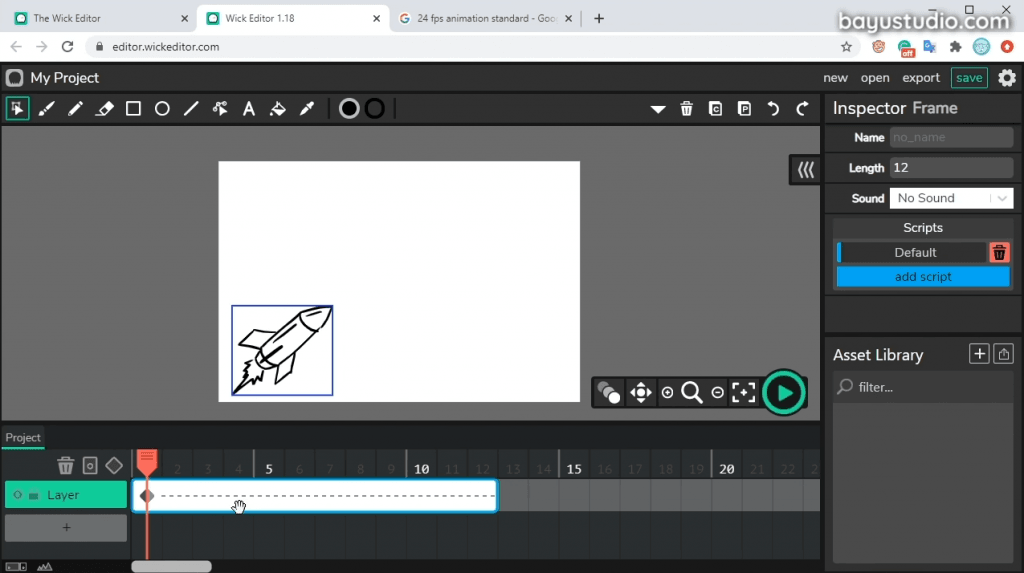
We showtime by adding a frame to the Layer. Then we create a keyframe by drawing a rocket. Because I use a tablet, I activate the enable pressure level. In frame 1 I draw a simple rocket like this.
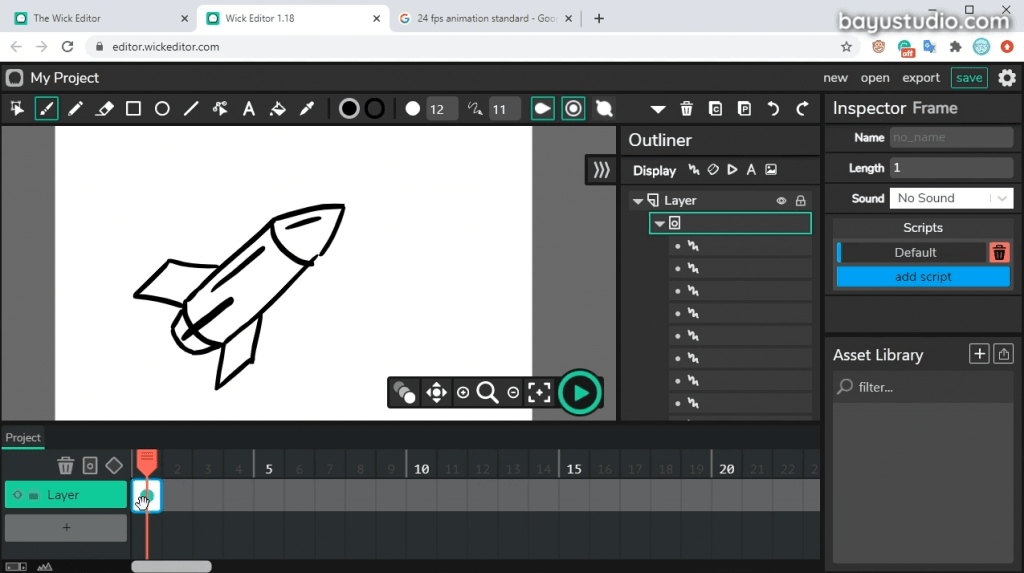
We want to move the rocket from the bottom left to the top right corner. Since it'southward the same epitome, we will apply the tween blitheness method. And then nosotros need to determine the initial position and the final position. And the rest volition be automatically created by the Wick editor.
Pull the frame and then that it is 12 frames long. Then to create a tween, click the keyframe first, then click Add Tween. Afterward applying the Add Tween, the frame will have a dotted line.
Then, in the destination frame, create another keyframe past clicking Add Tween again, then that at that place will be something like an arrow symbol. In this final frame, move the object to the desired location.
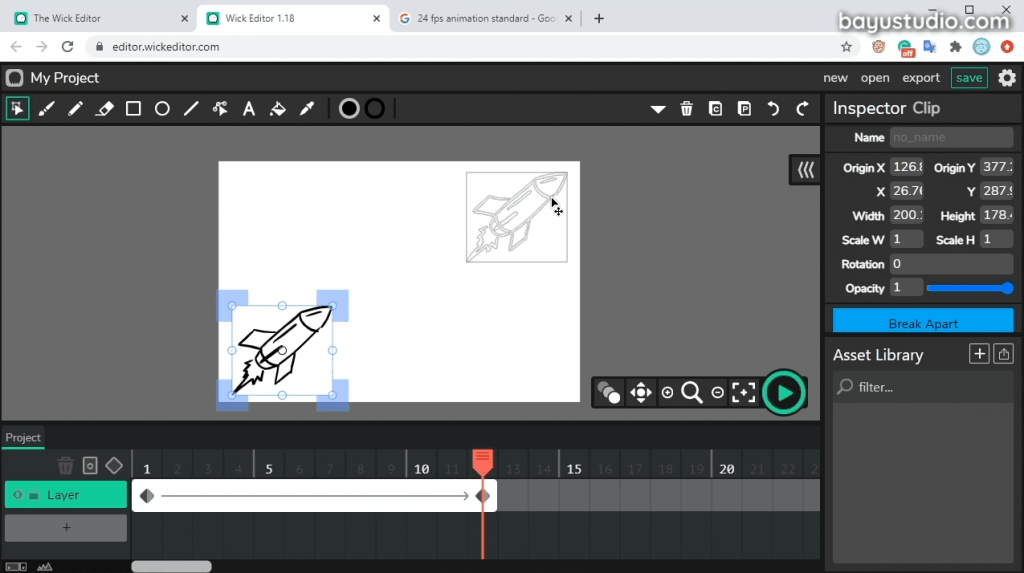
When using tween blitheness, this object will be kind of grouped, or in Wick, information technology is called a clip. Once the drawing becomes a clip, nosotros tin can't direct edit it in the main/root timeline anymore.
To edit the rocket, nosotros must enter the clip by double-clicking on the object. And then the editor will switch focus to the prune'southward canvas and here we tin edit the object.
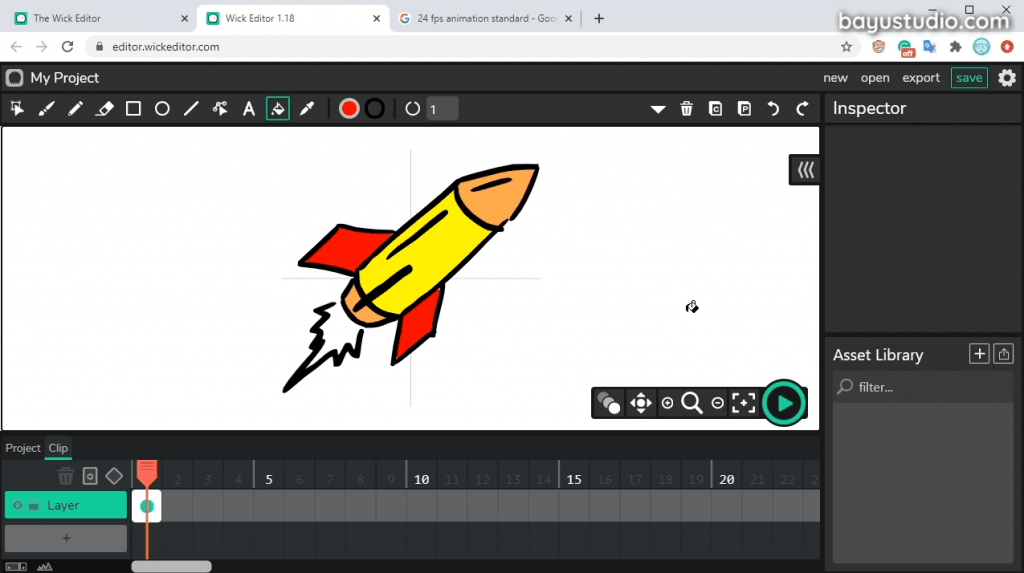
Allow's do that and so give our rocket color.
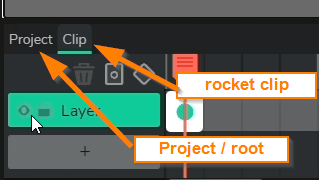
To render to the main canvas, we can double click the empty area on the canvas, or click Projection above the timeline. At present there is a kind of bureaucracy here, that is the root level (main timeline) and kid level (clip timeline).
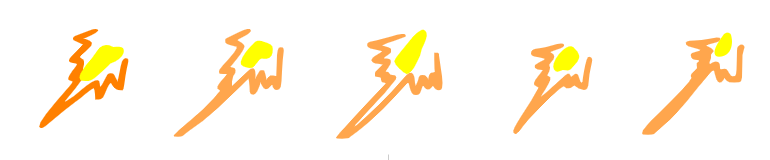
The clip has its own timeline. So nosotros can give more animation to the rocket object. For instance, nosotros will create a fire blitheness with frame by frame animation in v frames.
Since the rocket'due south body is going to be static and just the rocket flames that get animated, So we ameliorate separate the rocket and flame into different layers. Create a new layer (layer ii), we are going to motility flame to layer 2. Exercise information technology past cut the flame from the start layer, add keyframe In layer two, then paste it there.
Change the fire color via path inspector by clicking the flame object. And so in the properties section, change the make full color to orange.
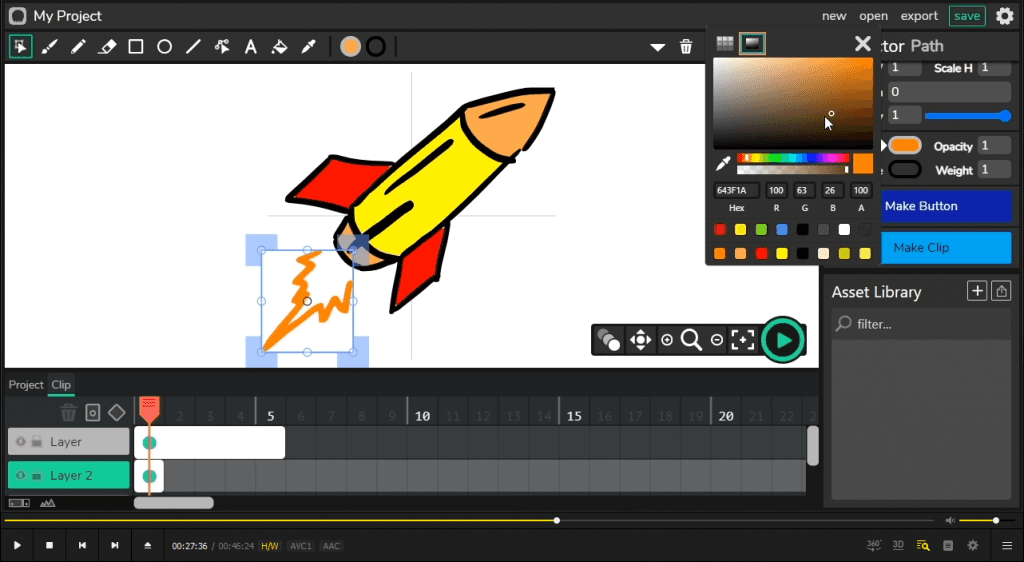
Since the rocket body is static, just extend the frame to occupy 5 frames.
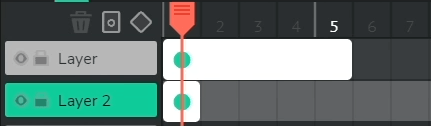
In layer 2, we are doing frame past frame animation. Turn the onion skinning on, to guide us for drawing flame. Continue drawing for the side by side frame, 2, iii, 4, and 5.
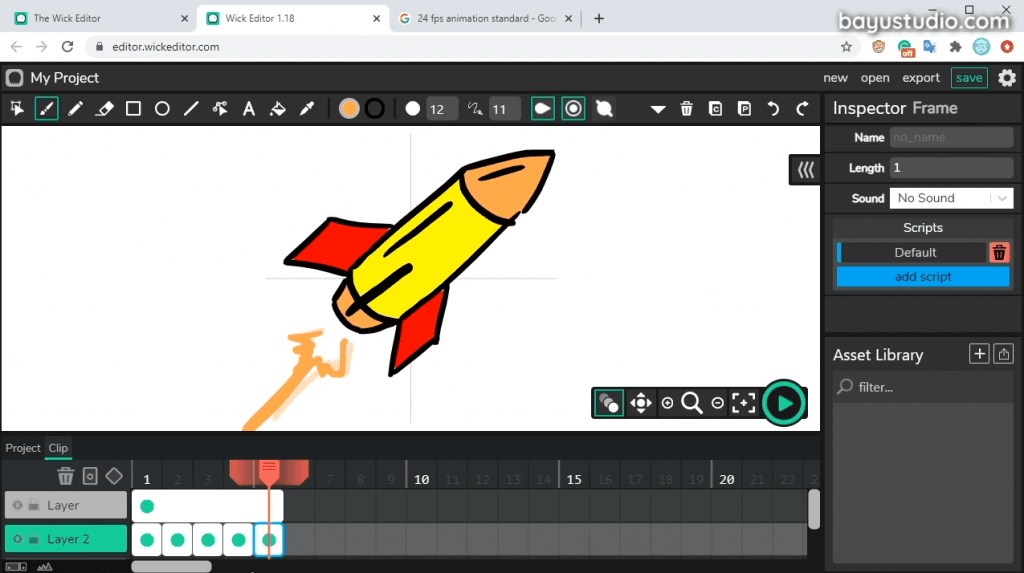
And so within the rocket clip, there is another blitheness in it. And when we return to the main timeline and click the play button, the clip animation that we just created will also appear.
If we desire the blitheness to be slower, pull the rocket frame on the main timeline, until it becomes 24 frames (2 seconds with 12 fps frame rate).

Then to select blitheness type, whether to loop or only play it once, nosotros tin can gear up information technology in the prune property in the inspector. Become to the Prune Inspector, past moving the play head to the keyframe (marked with a green dot on the frame), then select the object. In the clip inspector, at that place are several animation options and synced options. Let'southward hash out them one by one.
- Animation:
- Loop : The animation will go along to play.
- Unmarried Frame : Static animation past selecting only ane frame.
- Play Once : The animation will only play one time, after that it will stay still.
- Synced : The object will be animated when we movement the play caput. Then the main timeline with the clip timeline will be synced.
And so we have used ii animation methods. For the rocket object, nosotros use the tween animation method, where we only determine the initial and destination positions. And nosotros also practical frame by frame animation, which we applied to the fire object in 5 different frames.
From here we can tell which animation is suitable for certain conditions. If we need a move of an object, it's better to use the tween animation. Considering nosotros don't have to draw each frame. It'll go rid of the hassle. But if you want to describe the object freely, go for frame by frame blitheness.

We tin salvage the project by clicking Salvage button at the top right. Then the browser volition download the project file. Nosotros can open this file over again sometime.
We tin can also consign our animation. In that location are several format options here, such equally gif, mp4, and others. And then if our animation doesn't need sound, we tin relieve it in gif format. Merely if in that location is sound, nosotros can use the mp4 format.
In that location are interactive options on the export bill of fare. Wick editor not only creates static animations, simply we tin too create interactive animations too. So you tin make a button clickable, or even brand a game, by using JavaScript. Merely that's out of the telescopic of our discussion this fourth dimension. We're merely discussing animation hither.
Download rocket animation file: Rocket-Animation.wick
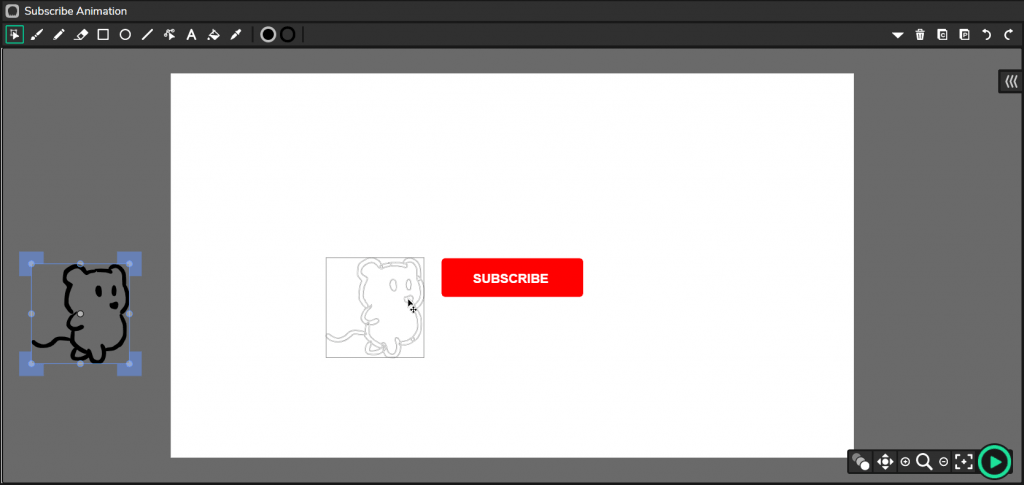
Make subscribe animation
In next exercise, nosotros will create another animation. The sample file is available and can exist downloaded at the stop of this department.
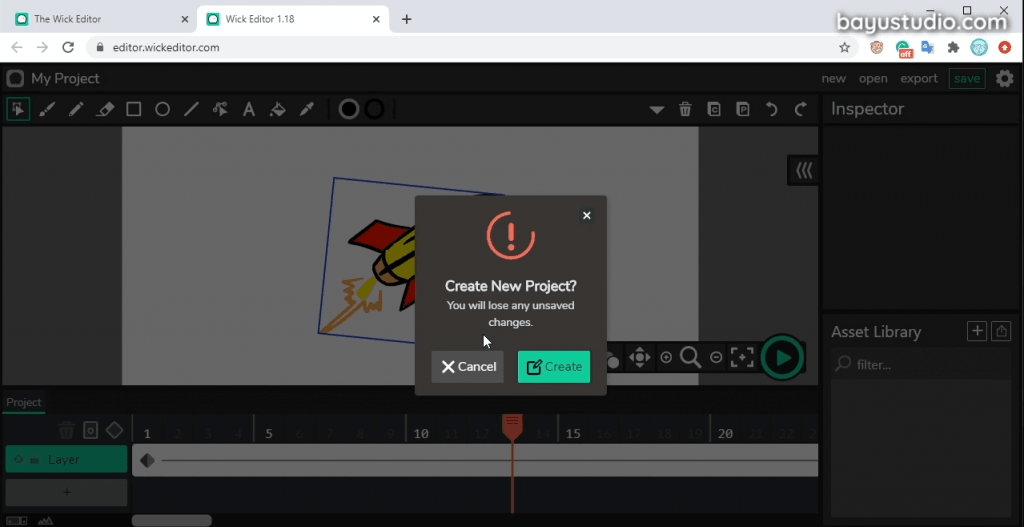
At present permit's create subscribe animation. Click New. There will exist questions "Create new project? You volition lose any unsaved changes". I accept saved it before, and so simply create information technology.
Then adjacent we gear up the My Project department. We proper noun it subscribe animation. Permit's give the frame rate 24, so it's smoother. So utilise HD format for the width and height, 1280×720, and click Apply.
The sail size will be bigger than before. If you lot feel that it looks likewise big, especially on a narrow screen like this, nosotros tin can merely zoom out the browser so it looks wider. This is one of the advantages of using a web-based application.
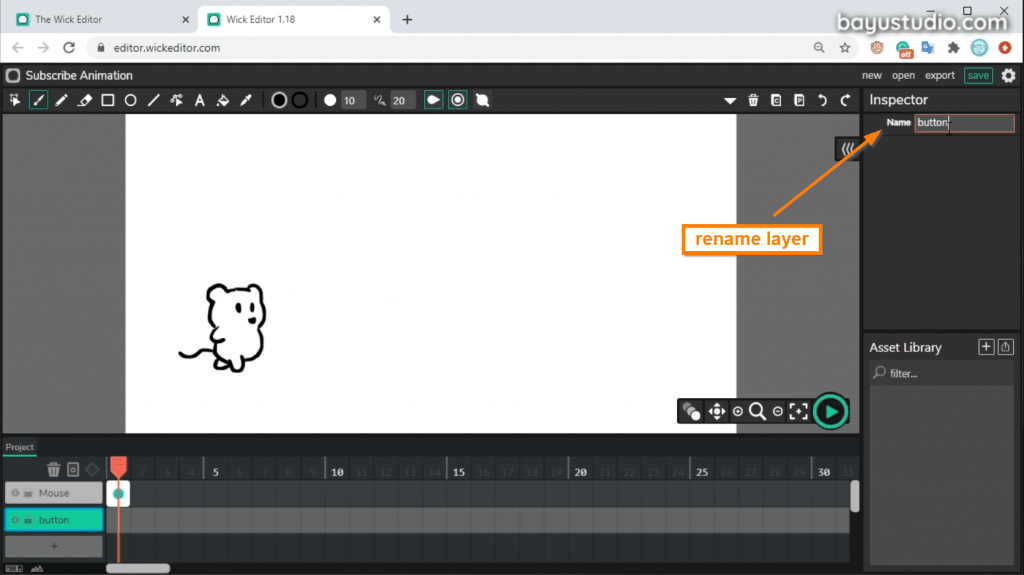
And then let's draw the main character, which is a mouse. We can rename the layer offset, past clicking on the layer, then type mouse in the inspector. Actuate the enable pressure get-go before drawing.
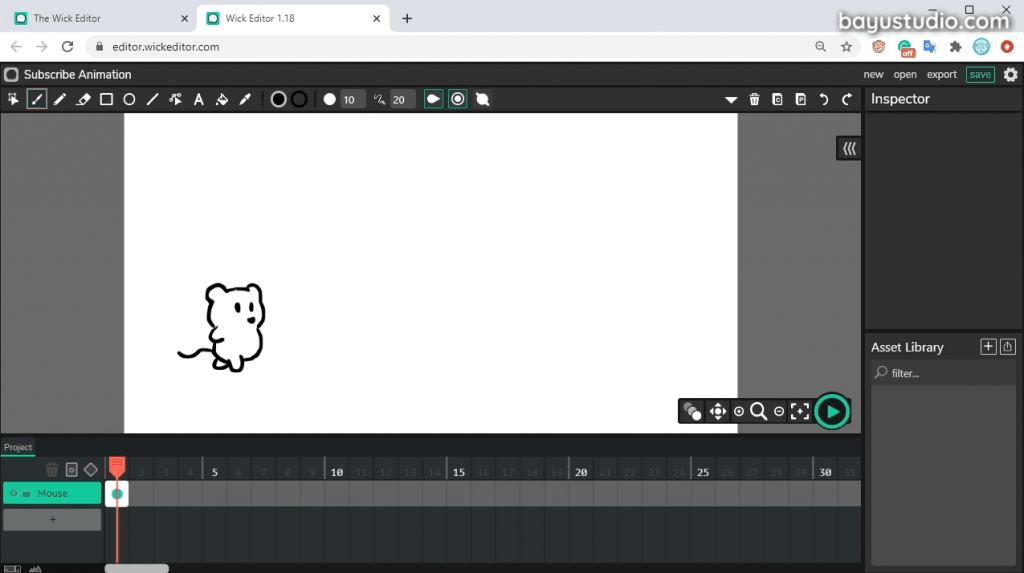
After nosotros end drawing the mouse, and then nosotros create a subscribe push. Nosotros make it on a new layer to brand information technology easier to manage. Nosotros give information technology a name button.

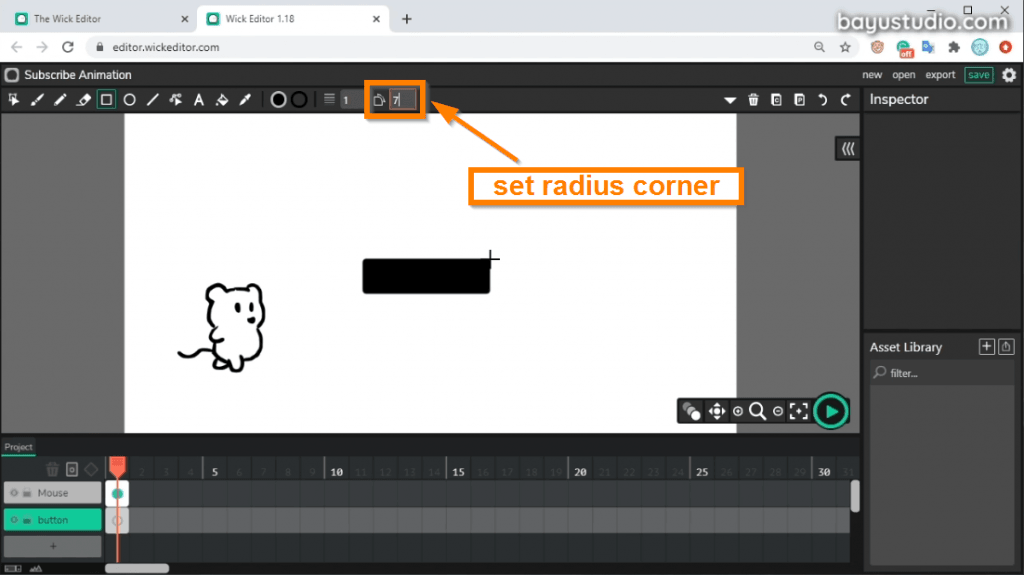
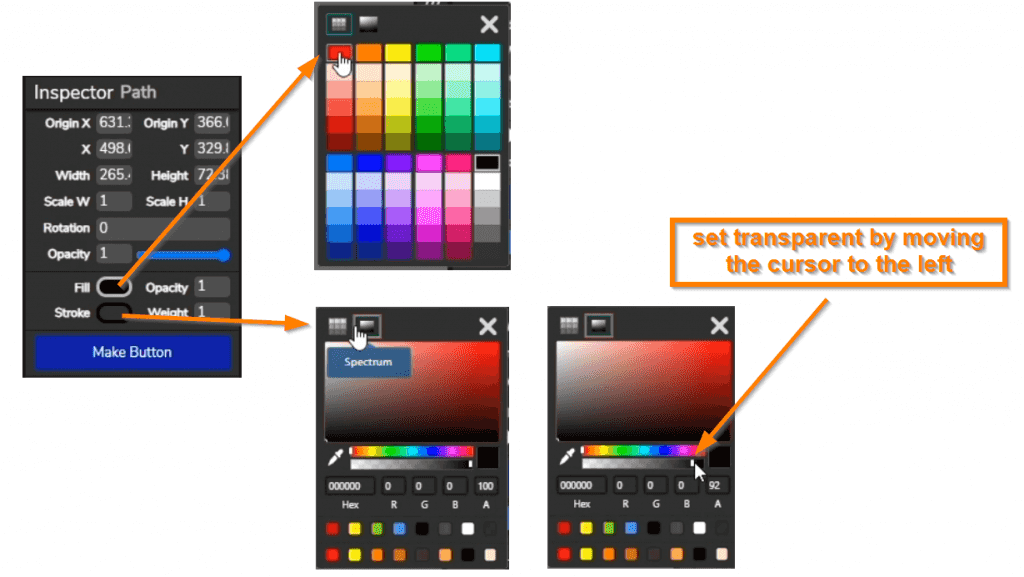
And then add a keyframe, and make a box with a corner radius of 7 and in red color. The stroke can be removed past setting the colour to transparent.
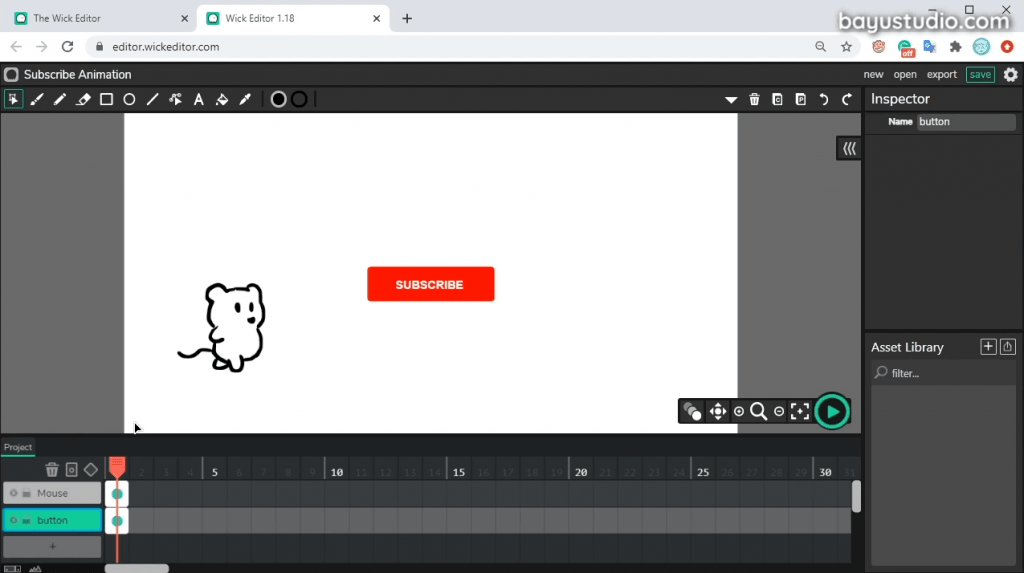
And then write subscribe, we make it bold with the white color font. Then nosotros have ii layers here, mouse and push.
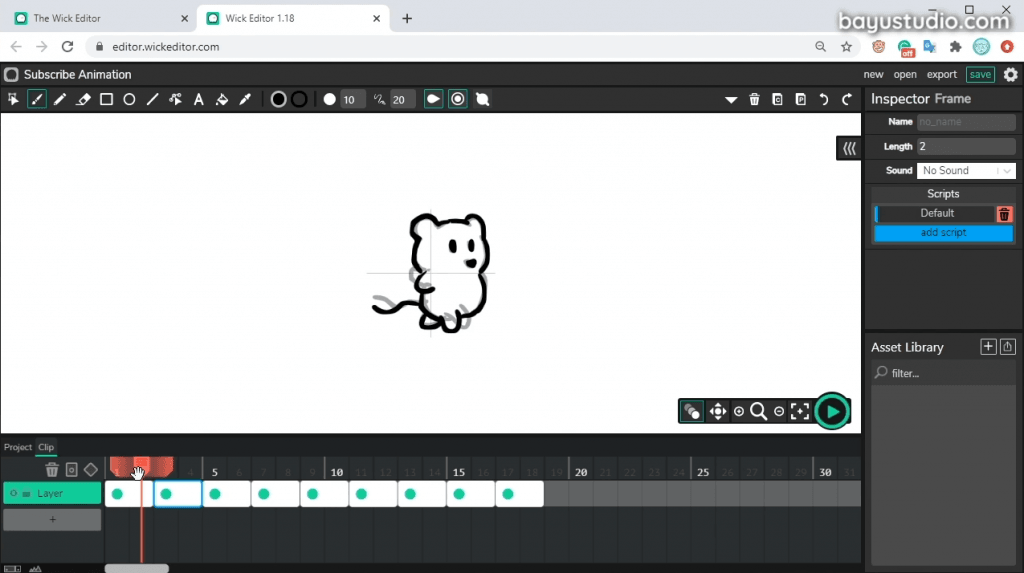
Then we desire to make the mouse animation move from the left to the subscribe button. Because information technology only needs to motion, then we utilise a tween blitheness method. We create a tween, with add together tween at the initial keyframe, and add tween at the destination frame (for case at frame 44). In the initial keyframe, motility the mouse object outside canvas (on the left side). In the destination keyframe, we move the mouse object near the subscribe button. We too drag the subscribe button to frame 62.

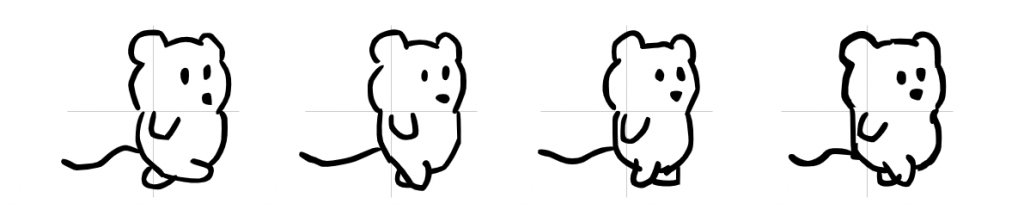
The mouse position has changed. Now we want to make this mouse walk. So nosotros need to create a frame by frame animation in the mouse clip. So nosotros enter the mouse clip by double-clicking the mouse. Nosotros can immediately draw to make the frame by frame animation, or turn the onion skinning on first, and so the shadow of earlier and later frames will appear.
It takes patience. Just the frame by frame animation produces a good result, fifty-fifty if I merely doodling to depict the object. Information technology's kind of artistic like hand drawing. To speed up the process, you can also copy the object from the previous frame and then edit the object. I only fabricated 9 keyframes, each ii frames long, and then that in that location are a total of 18 frames.

Next, we desire the mouse to cease when it is near the subscribe button. So allow's describe a frame by frame animation of the mouse facing forepart. Become to the master timeline.
Draw information technology in a new frame, not the frame in the mouse clip earlier. We draw the mouse each frame with unlike paw positions so that later on there will be an animation of hand movements. Nosotros draw starting from frame 45. We depict iv unlike frames with a length of 2 frames each. For the last frame, we elevate information technology longer so that the animation stops moving.
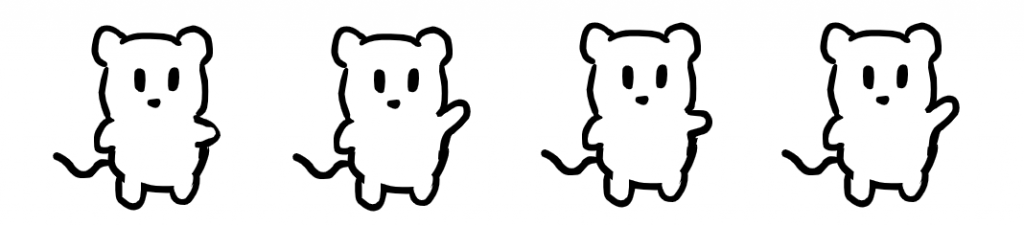

This is the result.
Download subscribe animation file: Subscribe-Animation.wick
I think that's all. This is just an introduction to the Wick editor, you can effort and create your own animation. Yous also can check the Wick editor'due south website, at that place are lots of tutorials, galleries, and forums. In that location are also examples of community projects on the website. Because this plan, although it'south elementary, information technology turns out to be very interesting.
DOWNLOAD HERE
Why Doesn't Paint Bucket Work Adobe Animate
Posted by: braddycarecter.blogspot.com
0 Response to "Why Doesn't Paint Bucket Work Adobe Animate"
Post a Comment